

A common example is a “Request a Consultation” form. A visitor enters their name, work email, company, project interest, timeline, and message. That data should create a new HubSpot contact, or update the existing contact if the same person submits the form again.
If this handoff is unreliable, leads can be missed, contacts can be duplicated, and the sales team may not get the right information.
The basic pattern is simple: keep the form on your website, validate the submission there, then send the data to HubSpot. The email address usually acts as the identifier, so HubSpot knows whether to create a new contact or update an existing one.
This way, your website stays in control of the form experience, while HubSpot handles contact tracking and follow-up.
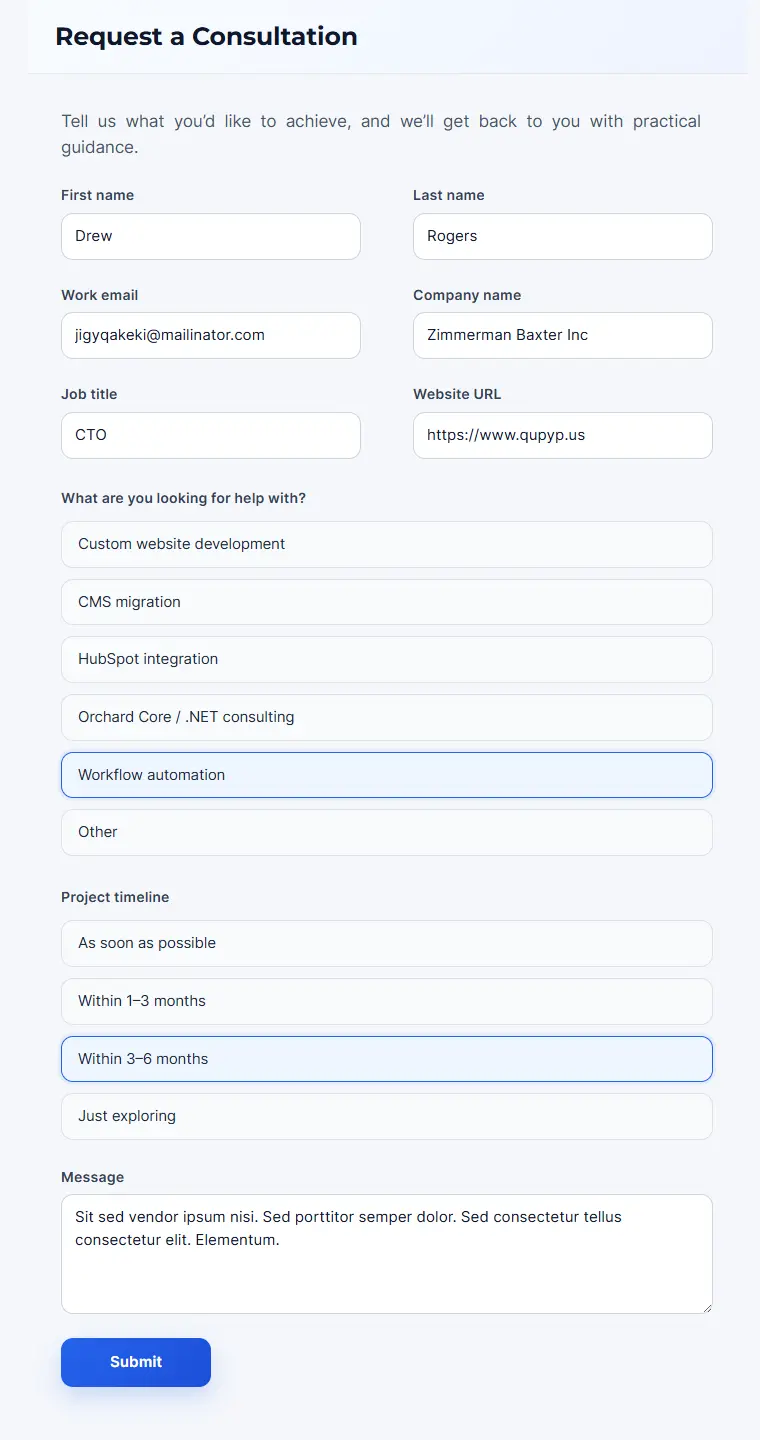
Choosing the right form setup
Sometimes, embedding a HubSpot form is enough. It is quick to set up, and HubSpot handles the form submission directly.
A custom website form makes more sense when the form needs to match the rest of the website, use custom validation, fit into a CMS-managed page, or do something before the data is sent to HubSpot.
You also need to decide how the data should reach HubSpot. A direct API call from the website to HubSpot is usually the simplest option if the website platform can handle this easily. Tools like Zapier, Make, or Power Automate can still be useful when one submission needs to trigger actions in several systems, but they shouldn’t be required just to create or update a HubSpot contact.
One thing to check before you switch from an embedded HubSpot form: a contact created through the API isn’t linked to the visitor’s HubSpot tracking cookie, so HubSpot can’t connect it to the pages and campaigns that brought the visitor in. If source reporting matters to your marketing team, pass that context along yourself (more on this below), or use HubSpot’s Forms API, which can take the tracking cookie with the submission.
For this use case, the main flow is one-way: website form to HubSpot contact. More advanced setups can also send data back from HubSpot to the website, for example to update a lead status or trigger a CMS workflow.
How this works with Orchard Core
Orchard Core is an open-source CMS and modular application framework built on ASP.NET Core. Among other features, it includes built-in support for forms and workflows. It is also modular and multi-tenant, so it can be easily extended when a project grows beyond the built-in features.
In this demo setup, the website has a “Request a Consultation” form. When someone submits it, an Orchard Core workflow receives the form data and sends it to HubSpot. The website authenticates with a HubSpot service key that only has access to contacts. HubSpot’s documentation explains how to create one.
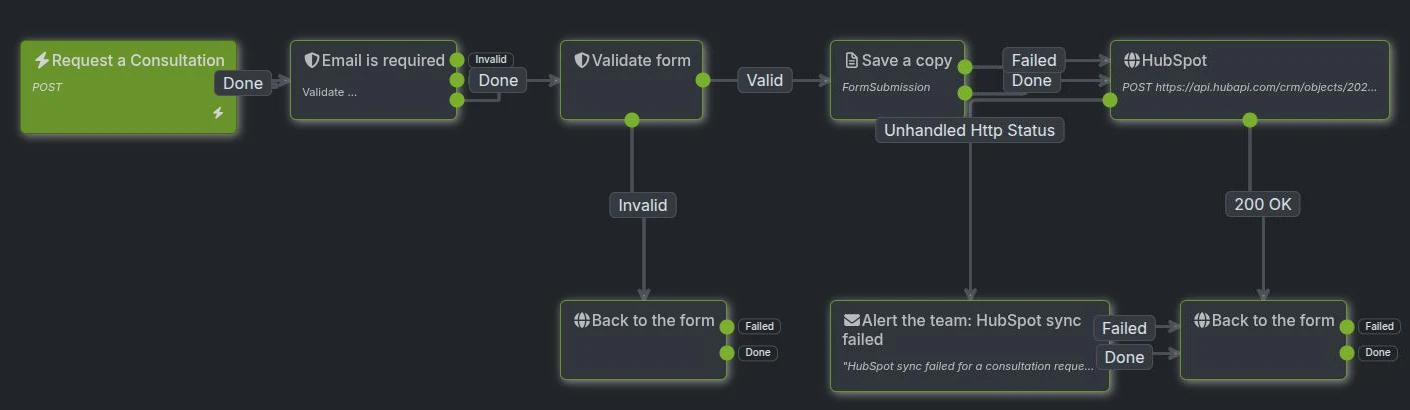
The workflow sends the submitted values to HubSpot’s contact upsert API. It uses the email address as the identifier, so HubSpot can create a contact when the email is new, or update the existing contact when the same person submits the form again.
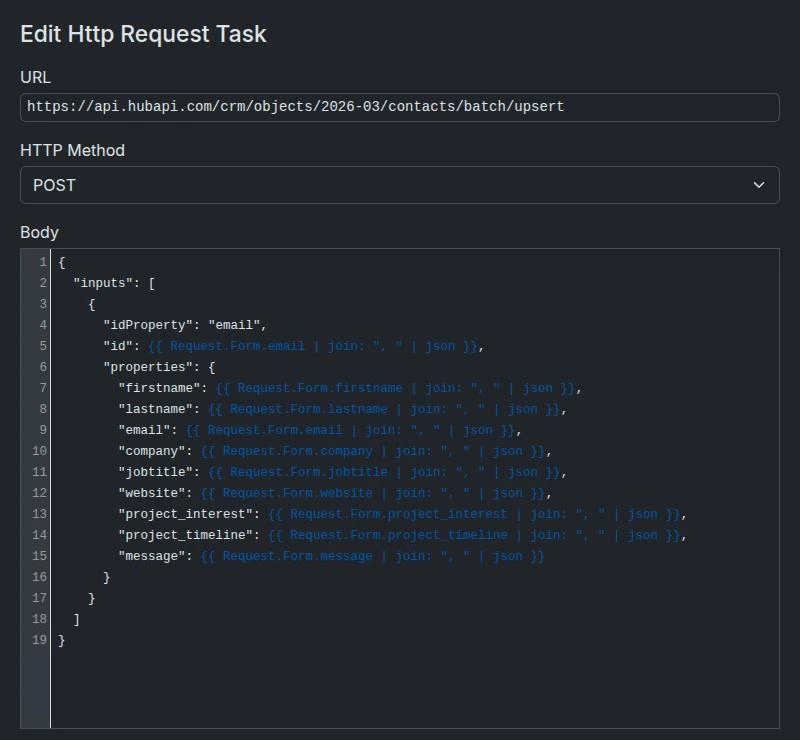
The form fields are mapped to HubSpot contact properties such as firstname, lastname, email, company, jobtitle, website, project_interest, project_timeline, and message. Standard HubSpot fields can be reused directly, while project-specific fields can be added as custom contact properties. Create these in HubSpot before going live: HubSpot rejects a request that refers to a property it doesn’t know.
If attribution matters, you can also pass additional context, such as the form name, page URL, campaign source, or other tracking fields your HubSpot setup uses.
After the contact is in HubSpot, it can handle the next steps. For example, it can notify someone, create a task, assign the lead, update the lifecycle stage, or branch based on the project interest or timeline.
What happens when HubSpot doesn’t accept a submission
This is the part most quick integrations skip, and it’s where leads get lost. An expired key, a missing property or a short HubSpot outage are enough to make a request fail. If nothing handles that, the visitor sees a normal confirmation and the lead never arrives anywhere.
The demo workflow handles it in two steps. It saves a copy of every valid submission on the website before calling HubSpot. And if HubSpot answers with anything other than success, it emails the team with the full submission, so someone can add the contact by hand. The visitor gets the same confirmation either way.
It also checks the submission before anything leaves the website: the form is protected against cross-site request forgery, and a submission without an email address is rejected instead of creating an empty contact.
When this approach makes sense
This setup is useful when you want HubSpot for lead tracking, but you don’t want your whole website to be limited by HubSpot’s website tools.
It may not be necessary if an embedded HubSpot form already does everything you need. And for complex two-way sync, strict compliance needs, or larger integrations with several systems, a custom integration or middleware setup may be better.
Not every HubSpot integration needs a custom form. Your CMS should still leave you the choice.
Running this on DotNest
Because this setup uses built-in Orchard Core features, the same pattern can also be implemented on DotNest, our managed Orchard Core SaaS hosting platform, without custom modules or infrastructure setup.
You can reproduce this simply by following the steps below:
- Create a form using Orchard Core’s built-in Forms module.
- Create a workflow using the built-in Workflows module. Enable the Workflows HTTP module as well.
- Configure the form so that submitting it triggers the workflow. Refer to this video for detailed instructions.
- Add a Validate Form Field activity for the email field, followed by a Validate Form activity. Send the Invalid outcome back to the form.
- Add a Create Content activity that saves a copy of the submission on the website.
- Add an HTTP Request activity that sends the submitted form data to HubSpot, and map the form fields to HubSpot contact properties. Write each value with Liquid’s
jsonfilter, for example{{ Request.Form.message | join: ", " | json }}, so a quote or a line break in a message doesn’t break the request. - Connect the HTTP Request activity’s failure outcome to an Email activity that alerts your team.
- Finish the workflow with the next step you need, such as redirecting the visitor to a confirmation page.
In the example below, the HTTP Request activity sends the form submission to HubSpot’s contact upsert API, using the submitted email address to create or update the contact.
That makes it a practical way to try the idea before committing to a larger implementation. You can start with a simple consultation form, send the data to HubSpot, and check that contacts are created and updated correctly.
For teams that want to try this without managing infrastructure first, DotNest is a good place to start. If you need help deciding between embedded HubSpot forms, direct API integration, middleware, or custom development, Lombiq can help you choose the right setup.


